Welcome to WordPress. This is your first post. Edit or delete it, then start writing!
Blog
-

Mashed Potatoes: The Ultimate Guide to Perfect, Fluffy Spuds
This series aims to uncover everything you need to know about creating the perfect mashed potatoes, from the rich history and diverse types of potatoes to mastering the essential techniques and troubleshooting common mistakes. We’ll walk you through each step, ensuring your mashed potatoes are creamy, fluffy, and flavorful every time. Let’s dive in!
The History and Origin of Mashed Potatoes
The History of Mashed Potato
A staple in many households, have a fascinating history. Originally cultivated by the Inca Indians in Peru, potatoes have been a vital food source for centuries. When Spanish explorers brought them to Europe in the 16th century, they quickly gained popularity.
In Ireland, the potato became essential, leading to dishes like champ and colcannon. These early versions laid the groundwork for the creamy mashed potatoes we know and love today. Across Europe, variations emerged, each adding unique twists to the basic recipe.
During the 1700s, potatoes became widely accepted in European cuisine. The French chef Antoine-Augustin Parmentier even held dinner parties to promote them. His efforts helped cement the potato’s place in culinary history. In the United States, mashed potatoes gained popularity in the 19th century, especially during the Thanksgiving celebrations.
Cultural Variations in Mashed Potatoes
Every culture brings its unique touch to mashed potatoes. In France, pommes purée are silky smooth and rich, often featuring copious amounts of butter. Meanwhile, British bubble and squeak incorporates leftover vegetables, creating a hearty, crispy variation.
In Sweden, potatismos includes a hint of nutmeg, adding a warm, spicy note. In India, mashed potatoes are often spiced with turmeric, cumin, and coriander, transforming them into a vibrant side dish known as aloo bharta.
Exploring these cultural variations offers inspiration and showcases the versatility of mashed potatoes. From comforting American classics to globally inspired recipes, there’s a mashed potato style for every palate.
Types of Potatoes for Mashing
Best Potatoes
Choosing the right potato is crucial for perfect mashed potatoes. Different varieties offer distinct textures and flavors, impacting the final result. Here’s a breakdown of the best types:
Russet Potatoes
Russet potatoes, often referred to as Idaho potatoes, are ideal for mashing. Their high starch content yields fluffy, light mashed potato. Russets absorb butter and cream exceptionally well, ensuring rich and creamy results.
However, they can become gluey if overworked, so handle them gently. For the best texture, use a potato ricer or masher. Avoid food processors, as they can turn russets into a sticky mess.
Yukon Gold Potatoes
Yukon Gold potatoes are a favorite for their buttery flavor and creamy texture. With medium starch content, they strike a perfect balance between smoothness and body. They don’t require as much butter or cream, making them a slightly healthier option.
Yukons hold their shape well, making them versatile for various mashed potato styles, from rustic to ultra-smooth. Their natural richness means you can achieve delicious with minimal effort.
Red Potatoes
Red potatoes, with their waxy texture, create denser. They’re perfect for those who enjoy a chunkier consistency. Reds are less starchy than russets or Yukons, resulting in a heartier dish.
These potatoes retain their shape well, even when mashed, making them excellent for rustic-style mashed potatoes. Their slightly sweet flavor adds a unique twist, making them a delightful choice for creative variations.
By understanding the characteristics of these potato types, you can tailor your mashed potatoes to your taste. Whether you prefer them light and fluffy or dense and hearty, selecting the right potato is the first step to perfection.
Ingredients and Variations

Essential Ingredients for Mashed Potatoes
Creating the perfect mashed potato requires a few key ingredients. While the basics are simple, each component plays a vital role in achieving the desired texture and flavor.
Butter
Butter is a cornerstone of great mashed potatoes. It adds richness and a silky texture. Use high-quality, unsalted butter to control the seasoning. For extra flavor, try browned butter or herb-infused butter.
Milk or Cream
The choice between milk and cream depends on your preference for richness. Cream yields the creamiest results, while milk provides a lighter texture. For a balance, consider half-and-half. Warm the dairy before adding it to prevent cooling the potatoes.
Salt and Seasonings
Proper seasoning is crucial. Salt enhances the natural flavor of potatoes, making them taste their best. Start with a teaspoon and adjust to taste. Beyond salt, experiment with garlic, chives, or even a hint of nutmeg for depth.
Creative Variations
Elevate your mashed potatoes with these creative twists. Each variation brings new flavors and textures, transforming a classic dish into something special.
Garlic
For garlic lovers, garlic mashed potato are a must-try. Roast a head of garlic until soft and fragrant, then blend it into the mashed potato. The result is a rich, savory side dish bursting with flavor.
Cheesy
Cheese lovers will adore cheesy mashed potatoes. Incorporate shredded cheddar, parmesan, or your favorite cheese into the mix. The cheese melts into the potatoes, creating a creamy, gooey delight.
Vegan
Vegan mashed potatoes can be just as creamy and delicious. Substitute butter with vegan butter or olive oil. Use plant-based milk like almond or oat milk. Season with nutritional yeast for a cheesy flavor.
Experimenting with these variations can turn a simple side dish into a highlight of your meal. Whether you stick with the classic or try something new, mashed potatoes offer endless possibilities.
Techniques for The Perfection
Step-by-Step Guide
Achieving perfect mashed potatoes involves a few key techniques. Follow this step-by-step guide to ensure consistently delicious results every time.
Preparing the Potatoes
Start by selecting the right potatoes. Peel and cut them into even chunks for uniform cooking. Place the potatoes in a large pot, cover with cold water, and add a generous pinch of salt. Bring to a boil, then simmer until the potatoes are fork-tender.
Mashing Methods
Mashing technique matters. For a smooth texture, use a potato ricer or food mill. These tools break down potatoes without overworking them. A traditional masher works well for chunkier mashed potatoes. Avoid blenders or food processors, as they can turn potatoes gummy.
Adding Ingredients
Drain the potatoes thoroughly to remove excess water. Return them to the pot and mash. Gradually add warm butter and milk or cream, blending until smooth. Season with salt and pepper, then taste and adjust as needed.
Achieving the Perfect Consistency
Consistency is key. For creamy mashed potato, add more butter and cream. For lighter, fluffier potatoes, use less. Mix gently to avoid overworking, which can make the potatoes gluey.
With these techniques, you can master the art of making the perfect mashed potato. Do not be afraid to explore and discover your favorite style—practice makes perfect.
Common Mistakes and How to Avoid Them

Common Mistakes
Even experienced cooks can encounter issues with mashed potatoes. Here are common mistakes and tips to avoid them.
Overmixing
Overmixing mashed potatoes releases starch, resulting in a gluey texture. To prevent this, handle the potatoes gently and use the right tools. Avoid electric mixers, which can quickly overwork the potatoes.
Using the Wrong Type of Potato
Choosing the wrong potato can affect the texture. High-starch potatoes like russets yield the best results. Waxy potatoes like reds can become too dense. For the best texture, stick with recommended varieties.
Not Seasoning Properly
Seasoning is crucial for flavor. Salt the cooking water and taste as you go. Don’t wait until the end to add salt, as it won’t distribute evenly. Experiment with additional seasonings like garlic or herbs for extra flavor.
How to Fix Watery
Watery mashed potatoes can be salvaged. Return them to the pot and cook over low heat, stirring constantly. The excess moisture will evaporate, and the potatoes will thicken. Alternatively, add a bit of instant potato flakes to absorb the liquid.
How to Fix Lumpy
Lumpy mashed potatoes often result from uneven cooking or insufficient mashing. To fix this, pass the potatoes through a ricer or food mill. If you don’t have these tools, use a sturdy masher and work the potatoes thoroughly.
Avoiding these common mistakes will help you achieve perfect mashed potato every time. With practice, you’ll develop a foolproof method for this classic dish.
Serving and Storing
How to Serve
Serving mashed potatoes well is the final step to perfection. Presentation and pairing can elevate your dish from simple to spectacular.
Best Accompaniments
Mashed potatoes go well with many different kinds of food. They complement roasted meats, poultry, and vegetables. For a comforting meal, serve them alongside pot roast or meatloaf. Their mild flavor balances richer, savory dishes.
Presentation Tips
Presentation matters. Serve mashed potato in a warm dish to maintain their temperature. For a splash of color, garnish with fresh herbs like parsley or chives. A drizzle of olive oil or melted butter adds an inviting sheen.
Storing and Reheating
Proper storage and reheating methods ensure your mashed potato remain delicious.
Refrigerating
Store leftovers in an airtight container in the refrigerator. They’ll keep for up to four days. To reheat, add a splash of milk or cream and warm gently over low heat, stirring frequently.
Freezing
For longer storage, freeze mashed potatoes. Place them in a freezer-safe container, leaving space for expansion. They’ll keep for up to three months. Thaw in the refrigerator overnight before reheating.
Reheating Methods
Reheat mashed potatoe on the stovetop, in the microwave, or in the oven. On the stovetop, use low heat and stir constantly. In the microwave, heat in short intervals, stirring between each. For the oven, cover with foil and bake at 350°F until warmed through.
By following these tips, you can enjoy perfectly reheated mashed potato that taste as good as freshly made.
Nutritional Benefits

Exploring the Health Aspects
While mashed potatoes are often seen primarily as comfort food, they also offer several nutritional benefits when prepared thoughtfully. Potatoes themselves are a good source of vitamins C and B6, potassium, and dietary fiber, especially when the skins are left on.
How to Make Mashed Potatoes Healthier
To boost the nutritional profile of your mashed potatoes, consider the following tips:
- Use skin-on potatoes to retain more fiber and nutrients.
- Opt for low-fat dairy options like skim milk or light cream to reduce calorie intake.
- Incorporate olive oil instead of butter for a heart-healthy fat choice.
- Add garlic and herbs such as rosemary and thyme for flavor and additional antioxidants without extra calories.
Frequently Asked Questions About Mashed Potatoes
Here are answers to some common questions about mashed potato, ensuring you have all the information you need for perfect results.
Can You Make Mashed Potatoes Ahead of Time?
It is possible to prepare mashed potatoes in advance. Prepare them as usual, then store them in the refrigerator. To reheat, add a bit of milk or cream and warm gently. This method ensures they remain creamy and delicious.
How Do You Keep Mashed Potatoes from Becoming Gluey?
To avoid gluey mashed potatoes, handle them gently and use the right tools. Stick to a masher, ricer, or food mill. Avoid overmixing, which releases starch and creates a sticky texture.
What Is the Best Way to Reheat Mashed Potatoes?
The best way to reheat mashed potatoes is on the stovetop or in the oven. Add a splash of milk or cream and warm gently over low heat. Stir frequently to ensure even heating. For the oven, cover with foil and bake at 350°F.
Can You Freeze Mashed Potatoes?
Yes, you can freeze mashed potatoes. Store them in a freezer-safe container, leaving space for expansion. Thaw in the refrigerator overnight before reheating. This method preserves their texture and flavor.
How Do You Make Mashed Potatoes Without Milk?
To make mashed potatoes without milk, use alternatives like chicken broth, vegetable broth, or non-dairy milk. Olive oil or vegan butter can also add richness. Season well to enhance flavor.
Conclusion of Mashed Potatoes
Comforting dish enjoyed worldwide. By understanding their history, choosing the right potatoes, and mastering essential techniques, you can create perfect mashed potato every time. Experiment with variations and troubleshoot common issues to elevate your mashed potato to new heights. Happy cooking!
-

Chicken Taco Seasoning: Perfect Homemade Recipe and Tips
Introduction
In this article, you’ll discover the wonders of chicken taco seasoning. From its history and ingredients to making and using it, we’ll cover everything you need to know. By the end, you’ll have the perfect recipe and tips for spicing up your chicken tacos. Let’s dive in!
What is Chicken Taco Seasoning?
Chicken taco seasoning is a flavorful blend of spices that brings a burst of Mexican flavor to your dishes. It’s a versatile mix that can elevate the taste of chicken tacos, adding a delicious kick that will leave you wanting more. Whether you’re preparing a quick weeknight dinner or hosting a taco night, this seasoning is your go-to.
History and Origin of Taco Seasoning
Taco seasoning has a rich history rooted in Mexican cuisine. Traditionally, it includes a mix of chili powder, cumin, and other spices that have been used for centuries to flavor various dishes. Over time, it has evolved, with many variations emerging, reflecting regional tastes and preferences. This evolution has made taco seasoning a beloved staple in kitchens around the world.
Ingredients for Chicken Taco Seasoning
Creating the perfect chicken taco seasoning at home starts with understanding the essential ingredients. Each spice plays a crucial role in developing the seasoning’s unique flavor profile.
Essential Ingredients
Chili Powder
Chili powder is the heart of any taco seasoning. It adds a smoky, spicy depth that defines the blend. Choose a high-quality chili powder to ensure the best flavor.
Cumin
Cumin brings an earthy, warm undertone that complements the chili powder. It’s a must-have for authentic taco seasoning.
Paprika
Paprika adds a sweet and slightly peppery flavor. It also gives the seasoning a vibrant red color, making your dishes visually appealing.
Garlic Powder
Garlic powder infuses a savory note that enhances the overall taste. It’s more concentrated than fresh garlic, providing a strong flavor.
Onion Powder
Onion powder adds a subtle sweetness and depth. It’s a key ingredient for balancing the spices.
Oregano
Oregano introduces a hint of herbal freshness. It rounds out the seasoning, making it more complex and aromatic.
Salt
Salt is essential for bringing out the flavors of the other spices. Use it sparingly to avoid overpowering the mix.
Pepper
Black pepper adds a mild heat and sharpness. It’s the final touch that completes the seasoning.
Optional Additions
To customize your chicken taco seasoning, consider these optional additions:
- Smoked Paprika: Adds a smoky flavor.
- Cayenne Pepper: Increases the heat.
- Ground Coriander: Adds a citrusy note.
How to Make Chicken Taco Seasoning

Making your own chicken taco seasoning is easy and rewarding. Follow these steps for a perfect blend every time.
Step-by-Step Instructions
Measure Your Ingredients
Start by measuring out all your ingredients. Precision ensures consistency in flavor. Use clean, dry measuring spoons and cups.
Mix the Spices
Combine all the spices in a bowl. Mix thoroughly until they’re evenly distributed. This ensures every bite of your taco has a balanced flavor.
Storing Your Seasoning
Store your homemade seasoning in an airtight container. Keep it in a cool, dark place to maintain its freshness. Proper storage ensures the spices retain their potency.
Tips for Best Results
Freshness of Spices
Always use fresh spices. Stale spices lose their flavor, diminishing the quality of your seasoning. Replace your spices every six months.
Storing Tips
Put the date you made the seasoning on the label of the container. This helps you keep track of its freshness. Airtight containers are a must to prevent moisture from ruining the mix.
Adjusting for Personal Taste
You are welcome to modify the recipe to your own tastes. If you like it spicier, add more chili powder or cayenne pepper. For a milder blend, reduce the heat.
Using Chicken Taco Seasoning
Now that you’ve made your seasoning, it’s time to put it to use. This part will guide you on how to cook with it and offer some delicious recipes.
Cooking with Chicken Taco Seasoning
Using your homemade seasoning is straightforward. Here’s how to season your chicken for maximum flavor:
- Season Generously: Coat your chicken evenly with the seasoning.
- Marinate: Let the chicken sit for at least 30 minutes to absorb the flavors.
- Cooking Methods: Grill, bake, or fry your seasoned chicken. Each method offers a unique texture and taste.
Recipes Featuring Chicken Taco Seasoning
Chicken Tacos
Make classic chicken tacos by cooking seasoned chicken and serving it in warm tortillas with your favorite toppings.
Chicken Taco Salad
Combine seasoned chicken with fresh greens, tomatoes, and avocados for a healthy and flavorful taco salad.
Chicken Taco Soup
Add seasoned chicken to a hearty soup base with beans, corn, and tomatoes for a comforting meal.
Chicken Taco Casserole
Layer seasoned chicken with tortillas, cheese, and salsa in a casserole dish. Bake until bubbly and golden.
Nutritional Information
Understanding the nutritional benefits and considerations of your seasoning can help you make healthier choices.
Nutritional Benefits
The spices in chicken taco seasoning offer numerous health benefits. For instance:
- Chili Powder: Rich in vitamins A and C, it boosts immunity.
- Cumin: Contains antioxidants that promote digestion.
- Garlic Powder: Known for its anti-inflammatory properties.
Dietary Considerations
Gluten-Free Options
Most homemade seasonings are naturally gluten-free. Ensure your spices are pure and not processed with gluten-containing additives.
Adjustments for Low-Sodium Diets
If you’re watching your salt intake, reduce the amount of salt in your mix. You can also use a salt substitute to maintain flavor without the sodium.
-

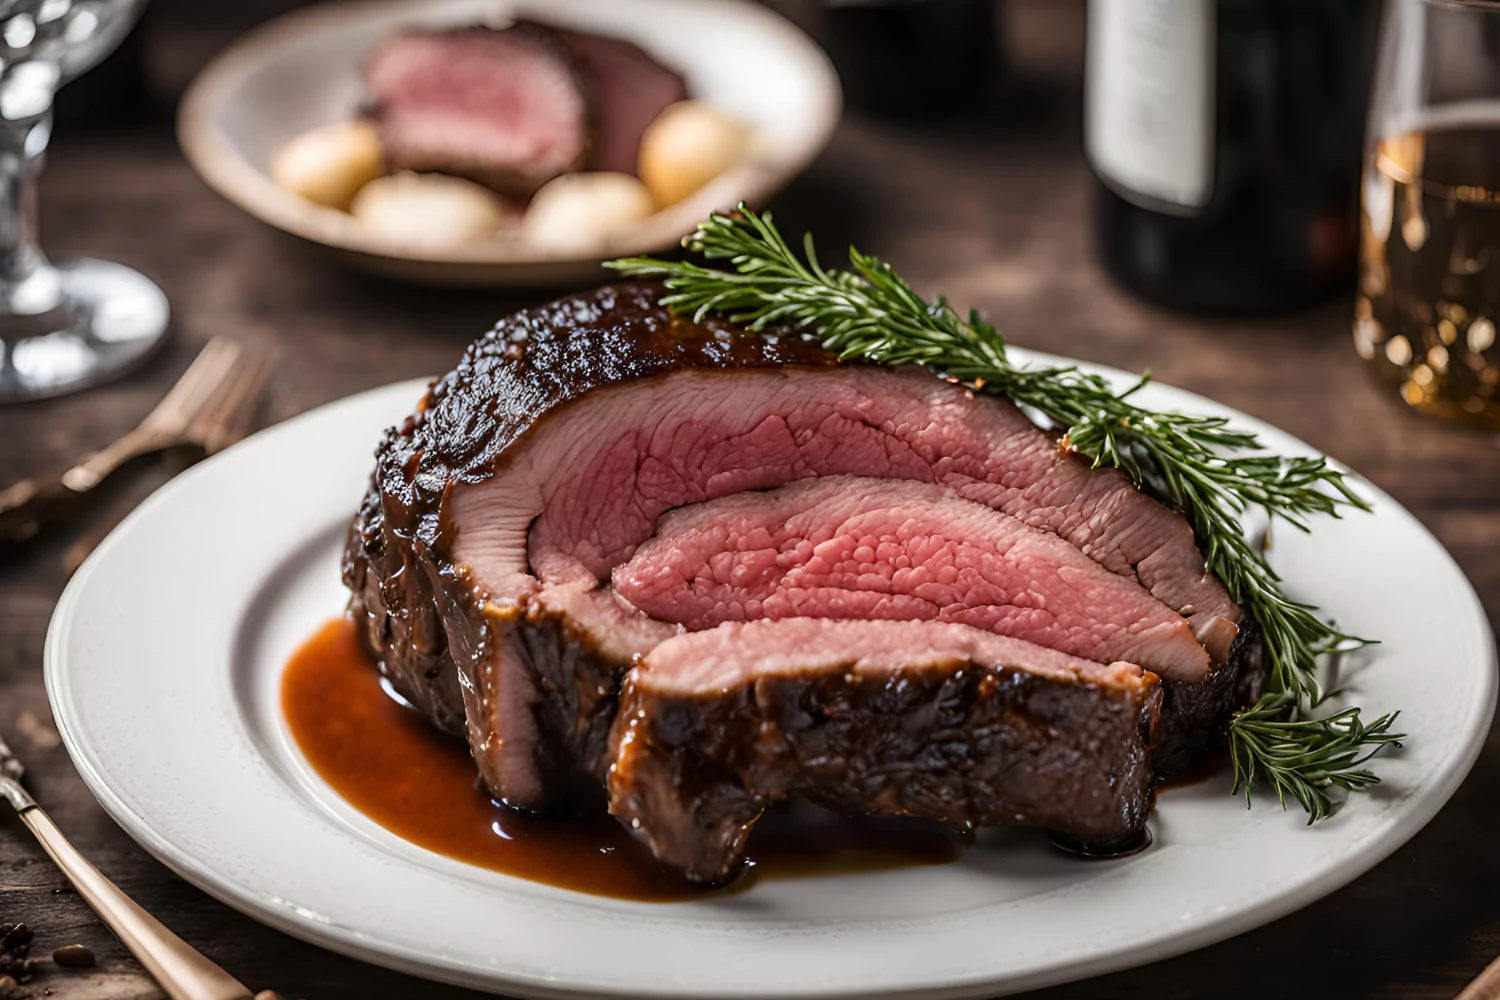
How to Smoke a Prime Rib: The Ultimate Guide for Perfect Results
Smoking a prime rib is an art that combines patience, precision, and passion. This comprehensive guide will walk you through every step of how to smoke a prime rib, ensuring your smoked prime rib turns out tender, juicy, and full of flavor. Whether you’re a seasoned pitmaster or a beginner, these tips and techniques will help you achieve the perfect smoked prime rib. We will cover everything from selecting the right cut and seasoning to monitoring the smoking process and achieving the perfect crust, ensuring your prime rib is the star of your meal.
Introduction
Understanding Smoked Prime Rib
Smoking a prime rib creates a succulent, flavorful dish that’s perfect for special occasions. This method infuses the meat with a smoky aroma and a tender texture that’s hard to beat. But why choose smoked prime rib over other cooking methods? Smoking allows the meat to cook slowly, absorbing rich flavors from the wood and seasoning. The result is a mouth-watering, fall-apart tender prime rib that stands out in any meal.
Preparing Your Prime Rib
Selecting the Right Cut
Choosing the right cut is crucial for a successful smoked prime rib. You’ll want a high-quality cut, preferably USDA Prime or Choice. These grades ensure marbling and tenderness. Now, should you go bone-in or boneless? Bone-in prime rib typically retains more moisture and flavor during the smoking process, making it a popular choice.
Seasoning the Prime Rib
The seasoning is where you can get creative. Start with basic ingredients like salt, pepper, garlic powder, and onion powder. For a richer flavor, consider creating a dry rub. Combine paprika, thyme, rosemary, and brown sugar to enhance the meat’s natural flavors. Marinades and injections can also be used to infuse the meat with additional moisture and taste. A simple marinade with olive oil, soy sauce, and herbs can work wonders.
Preparing the Prime Rib for Smoking
Before smoking, trim any excess fat from the prime rib. This helps prevent flare-ups and ensures even cooking. Tying the roast with butcher’s twine maintains its shape and promotes uniform cooking. Once prepped, let the prime rib rest at room temperature for about an hour. This allows the seasoning to penetrate and the meat to cook more evenly.
Smoking Equipment and Setup

Choosing the Right Smoker
Selecting the right smoker is essential. Electric smokers offer convenience and ease of use, while charcoal smokers provide a traditional smoky flavor. Pellet smokers are a versatile option, combining the benefits of both electric and charcoal. Some recommended brands include Traeger, Weber, and Masterbuilt.
Setting Up Your Smoker
Proper setup is key. Start by cleaning your smoker to remove any residue. Preheat the smoker to a temperature of around 225°F. This low and slow approach ensures the meat cooks evenly and absorbs the smoky flavor. Add wood chips or pellets to the smoker. Hickory, mesquite, and applewood are excellent choices for smoking prime rib.
Smoking the Prime Rib
Placing the Prime Rib in the Smoker
When placing the prime rib in the smoker, position it with the bone side down. This helps distribute heat evenly. Make sure there’s enough space around the meat for the smoke to circulate. Using a drip pan underneath the prime rib catches the drippings and prevents flare-ups.
Monitoring the Smoking Process
Keep an eye on the internal temperature of the meat using a meat thermometer. Insert the thermometer into the thickest part of the roast. Aim for an internal temperature of 130°F for medium-rare or 140°F for medium. Throughout the smoking process, spritzing the meat with apple juice or a similar liquid keeps it moist and flavorful.
Smoking Times and Temperature
Maintaining a consistent smoker temperature is vital. Keep it between 225°F and 250°F. As a general rule, smoke the prime rib for about 35 minutes per pound. This will vary based on the size of the roast and your desired level of doneness.
Finishing Touches
Achieving the Perfect Crust
The crust, or bark, is one of the most delightful parts of smoked prime rib. To achieve this, consider a reverse sear. Once the internal temperature is just below your target, increase the smoker’s heat to 400°F and sear the roast for 10-15 minutes. Using a meat thermometer ensures accuracy and prevents overcooking.
Resting and Carving the Prime Rib
After smoking, let the prime rib rest for at least 20 minutes. Because of the redistribution of the liquids, the meat becomes more tasty and soft. For optimal tenderness, cut against the grain when carving. Use a sharp carving knife to make clean, even cuts.
Serving Suggestions
Accompaniments and Sides
A wide range of side dishes go well with prime rib. Traditional sides like mashed potatoes, roasted vegetables, and a fresh salad are always a hit. For a creative twist, consider serving it with garlic herb butter or a tangy horseradish sauce.
Beverage Pairings
While traditionally prime rib is paired with certain wines, you can also enjoy it with non-alcoholic beverages. Try serving with iced tea, sparkling water, or a fruity mocktail to complement the rich flavors of the meat.
Troubleshooting and Tips
Common Issues and Solutions
Even experienced cooks can encounter issues. If your prime rib is overcooked, try serving it with a flavorful gravy to add moisture. For undercooked meat, return it to the smoker until it reaches the desired temperature. If the meat is dry, consider basting it more frequently next time or using a marinade.
Expert Tips for Perfect Smoked Prime Rib
Professional chefs often recommend letting the prime rib sit in the fridge overnight with the dry rub. This dry brining method enhances the flavor and tenderness. Another tip is to use a water pan in the smoker to maintain humidity and prevent the meat from drying out. Readers also suggest using a meat injector to infuse the roast with additional flavor.
FAQ Section
How long does it take to smoke a prime rib?
The smoking time depends on the size of the roast and the smoker’s temperature. On average, it takes about 35 minutes per pound at 225°F. For more information check out here.
What is the best wood for smoking prime rib?
Hickory, mesquite, and applewood are popular choices. Hickory provides a strong, smoky flavor, mesquite adds a robust taste, and applewood offers a sweeter, milder smoke.
Can I smoke a frozen prime rib?
It’s best to thaw the prime rib completely before smoking. Smoking a frozen prime rib can lead to uneven cooking and an undesirable texture.
How do I store leftover smoked prime rib?
Remaining food can be kept in the refrigerator for up to four days if it is sealed tightly. For longer storage, wrap the meat tightly in plastic wrap and aluminum foil, then freeze for up to 3 months.
What internal temperature should a smoked prime rib reach?
An interior temperature of 130°F is the target for medium-rare. For medium, target 140°F. Use a meat thermometer to ensure accuracy.
Conclusion
Final Thoughts on Smoking Prime Rib
Smoking a prime rib may seem daunting, but with the right preparation and techniques, you can achieve delicious results. Remember, practice makes perfect, so don’t be afraid to experiment and adjust the process to suit your taste.
-

How Long to Smoke Prime Rib? | Complete Guide & Tips
Smoking prime rib to perfection requires a blend of time, temperature, and technique. This guide will walk you through the process from preparation to the final juicy slice, ensuring your prime rib is the star of any meal.
Introduction
Smoking prime rib offers a flavor that’s hard to beat. Whether you’re a seasoned pitmaster or a beginner, understanding the nuances of smoking this cut of meat can elevate your cooking game. Let’s dive into the essentials of how long to smoke prime rib and achieve mouth-watering results.
Choosing the Right Prime Rib
Selecting the best prime rib is the first step to a successful smoke. You can opt for bone-in or boneless, each with its unique benefits.
Bone-in vs. Boneless Prime Rib
- Bone-in prime rib cooks faster and stays moist.
- Boneless prime rib is easier to slice and serve.
When shopping, look for well-marbled meat. This ensures tenderness and flavor.
Essential Tools for Smoking Prime Rib
To smoke prime rib effectively, you’ll need specific tools. Here’s what you’ll need:
- Smoker: Consistent temperature control is key.
- Meat Thermometer: Ensures precise internal temperature.
- Cutting Board and Sharp Knife: For easy carving.
Having these tools ready makes the process smoother and more enjoyable.
Trimming and Seasoning the Prime Rib
Before you start smoking, prepare your prime rib by trimming and seasoning it.
Trimming Excess Fat
- Trim excess fat to about 1/4 inch thick.
- This helps the seasoning penetrate better.
Seasoning Techniques
- Dry Brining: Season with salt and let it rest overnight.
- Rub and Marinade: Use a mix of garlic, mustard, and herbs for a flavorful crust.
Seasoning is crucial for enhancing the meat’s natural flavors and ensuring a delicious crust.
Setting Up the Smoker
Proper smoker setup is vital for smoking prime rib.
Preheating the Smoker
- Preheat to 225°F.
- Use wood chips like hickory or apple for a rich, smoky flavor.
Consistency in temperature ensures even cooking and a perfect smoke ring.
Smoking the Prime Rib

Now, let’s get into the smoking process.
Smoking Times Based on Doneness
- Rare: Smoke until internal temperature reaches 120°F (30-35 minutes per pound).
- Medium Rare: 130°F (35-40 minutes per pound).
- Medium: 140°F (40-45 minutes per pound).
Using a meat thermometer, check the temperature regularly to avoid overcooking.
Resting the Prime Rib
Techniques of Resting
- Remove the prime rib from the smoker.
- Tent with foil and let it rest for 30 minutes.
Resting allows juices to be redistributed, making the meat tender and juicy.
Reverse Searing the Prime Rib
To finish, reverse sear the prime rib for a perfect crust.
Steps for Reverse Searing
- Preheat the oven to 500°F or your grill to high heat.
- Sear the prime rib for 10 minutes.
This step gives the prime rib a beautiful, caramelized exterior.
Serving Suggestions
Once your prime rib is perfectly smoked and seared, it’s time to serve.
Carving the Prime Rib
- Slice against the grain for maximum tenderness.
- Serve with sides like mashed potatoes or roasted vegetables.
Proper slicing ensures each bite is tender and flavorful.
Expert Tips
A few expert tips can make a big difference.
Avoiding Common Mistakes
- Don’t overcook: Use a thermometer to check the temperature.
- Maintain moisture: Keep the smoker closed as much as possible.
These tips help in achieving a perfect smoked prime rib every time.
Storing and Reheating Leftovers
Got leftovers? Here’s how to store and reheat them.
Storing Prime Rib
- Wrap tightly in plastic wrap.
- Store in an airtight container.
Reheating Tips
- Reheat in the oven at 300°F until it reaches 160°F.
- Avoid microwaving to prevent losing tenderness.
Proper storage and reheating keep your prime rib delicious even the next day.
FAQs About Smoking Prime Rib
Answering some common questions can clear up any doubts.
How long does it take to smoke a prime rib at 225°F?
- It depends on the weight and desired doneness, typically 30-45 minutes per pound.
Should I smoke prime rib in a pan?
- Smoking in a pan can help retain juices, but it’s not necessary for a good result.
What is the best wood for smoking prime rib?
- Hickory, apple, or cherry wood are great choices for a balanced smoky flavor.
Do I need to spritz the prime rib while smoking?
- Because of the high fat content of the meat, it is not necessary, but it can add more moisture.
Conclusion
Smoking prime rib is an art that, when done right, yields incredibly delicious results. From choosing the right cut to mastering the smoking process, this guide covers everything you need to know. Happy smoking!
This resource offers comprehensive information on healthy eating and food groups, which can be helpful if you want to discuss nutritional aspects of prime rib or suggest balanced side dishes. For more details, visit MyPlate.
-

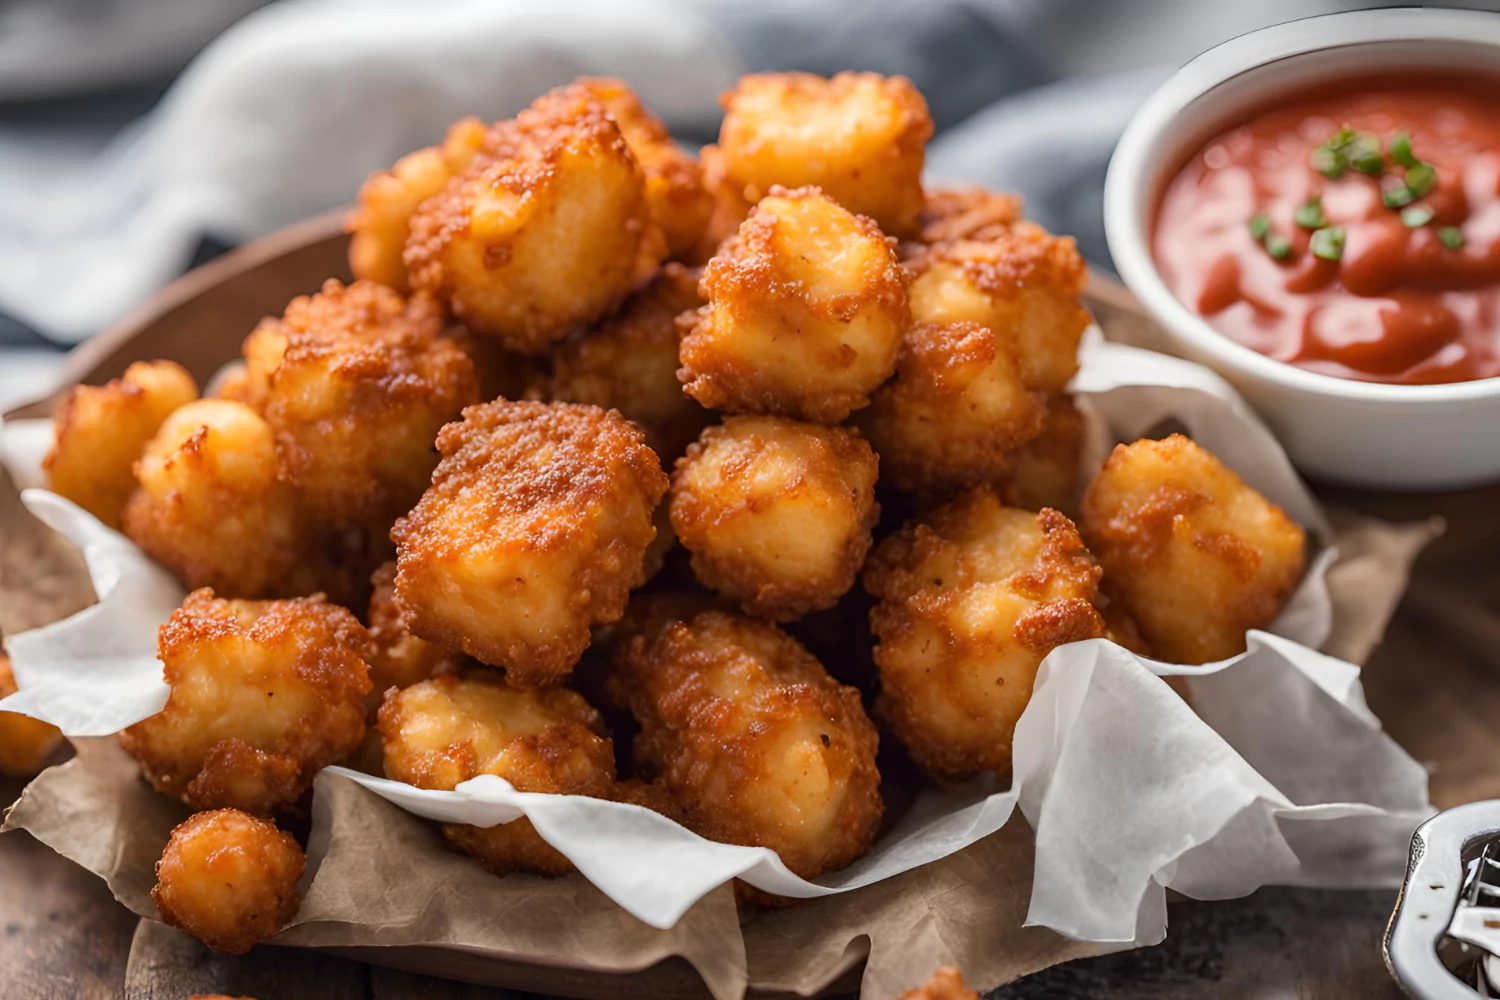
How to Cook Tater Tots in Air Fryer: Easy & Crispy Recipe
Tater tots are a beloved snack, and cooking them in an air fryer can make them even more delicious. In this article, we’ll dive into the step-by-step process of cooking tater tots in an air fryer. You’ll discover the benefits of using an air fryer, how to prepare and cook tater tots, and some pro tips for achieving perfect crispiness. Let’s get started!
Introduction To How To Cook Tater Tots In Air Fryer
What Are Tater Tots?
Tater tots are small cylinders of grated potatoes, fried to crispy perfection. They were invented in 1953 and quickly became a favorite snack in households and restaurants alike. Known for their crunchy exterior and soft interior, tater tots are versatile and can be enjoyed in numerous ways.
Why Use an Air Fryer for Tater Tots?
Using an air fryer to cook tater tots offers several advantages. Not only does it reduce the amount of oil needed, making them healthier, but it also ensures even cooking and a crisp texture. Air fryers cook faster than traditional ovens and are easy to use, making them perfect for quick snacks or side dishes.
Equipment Needed
To get started, you’ll need the following equipment:
- Air Fryer: Any model will work, but ensure it has enough capacity for your needs.
- Cooking Spray: This helps achieve a crispy exterior.
- Tongs: Useful for shaking and flipping the tots.
Ingredients
The ingredients are simple:
- Frozen Tater Tots: Any brand works, though Ore-Ida is a popular choice.
- Cooking Spray: Helps prevent sticking and adds crispiness.
- Seasonings: Optional, but recommended for extra flavor. Consider using seasoned salt or garlic powder.
Prepping the Air Fryer
Before cooking, it’s essential to prepare your air fryer:
- Preheat: Set your air fryer to 400°F and let it preheat for about 3-5 minutes.
- Prepare the Basket: Spray the air fryer basket lightly with cooking spray to prevent the tater tots from sticking.
Following these initial steps will ensure your tater tots come out perfectly crispy every time. In the next part, we’ll dive into the cooking process, providing you with a foolproof method for air frying tater tots.
Preparation
Basic Method
Cooking tater tots in an air fryer is straightforward and yields fantastic results. Follow these steps for a crispy, delicious snack.
- Preheat the Air Fryer: Set your air fryer to 400°F and allow it to preheat for 3-5 minutes.
- Add Tater Tots: Place the frozen tater tots in the air fryer basket. Ensure they’re in a single layer to cook evenly. You can overlap slightly, but for the best results, avoid overcrowding.
- Cook Time: Cook the tater tots for 12-15 minutes. Shake the basket every 5 minutes to ensure they cook evenly. If you prefer them extra crispy, add 1-2 more minutes.
Enhancing the Flavor
Seasoning your tater tots can take them to the next level. Here are some seasoning ideas to try:
- Seasoned Salt: Adds a burst of flavor.
- Garlic Powder: For a subtle, savory taste.
- Italian Herbs: Perfect for a Mediterranean twist.
- Cayenne Pepper: Adds a spicy kick.
Sprinkle your chosen seasonings over the tater tots after shaking the basket halfway through cooking for the best results.
Cooking Time and Temperature
Consistency is key when air frying tater tots. Here’s a quick guide to the optimal settings:
- Temperature: 400°F is ideal.
- Time: 12-15 minutes, depending on your air fryer model. Shake the basket halfway through cooking.
Using these settings ensures that your tater tots are crispy on the outside and soft on the inside.
Shaking and Flipping
Shaking the basket is crucial for even cooking. Here’s why:
- Prevents Sticking: Shaking the basket helps prevent the tots from sticking to each other or the basket.
- Even Crispiness: Ensures all sides get equal exposure to the hot air, resulting in uniform crispiness.
Shake the basket gently every 5 minutes. For larger batches, consider flipping the tots with tongs to ensure even cooking.
In the next part, we’ll explore various serving suggestions and dipping sauces that pair perfectly with air fryer tater tots. Keep reading to find out how to make your tater tots even more irresistible!
Serving Suggestions
Dipping Sauces
No tater tot experience is complete without a delicious dipping sauce. Here are some popular choices:
- Ketchup: A classic choice.
- Ranch Dressing: Perfect for a creamy, tangy dip.
- Barbecue Sauce: Adds a smoky sweetness.
- For those who enjoy a cheesy kick, there is nacho cheese.
- Honey Mustard: Combines sweetness and tanginess.
- Buffalo Sauce: Great for a spicy twist.
- Thousand Island Dressing: A rich and creamy option.
Each of these sauces enhances the flavor of your tater tots in a unique way, making them even more enjoyable. For a homemade twist, try mixing some BBQ sauce and hot sauce for a spicy, sweet dip.
What to Serve with Tater Tots
Tater tots are incredibly versatile and can complement many dishes. Here are some ideas:
- Burgers: Classic combo that never fails.
- Hot Dogs: Another traditional pairing.
- Grilled Cheese: Perfect for a cozy meal.
- Chicken Wings: Great for a game day snack.
- Fish Sticks: Adds a crunchy, savory side.
- Chicken Tenders: Ideal for a family-friendly meal.
- Breakfast: Serve with eggs and bacon for a hearty breakfast.
Pairing tater tots with these dishes makes for a delightful meal that everyone will love.
Advanced Tips
Making Homemade Tater Tots
While frozen tater tots are convenient, making them from scratch can be rewarding. Here’s a simple recipe:
Ingredients:
- 2 large potatoes
- 1 tablespoon flour
- Salt and pepper to taste
- Cooking spray
Instructions:
- Grate the Potatoes: Grate the potatoes and squeeze out excess moisture.
- Mix Ingredients: Combine grated potatoes, flour, salt, and pepper.
- Shape Tots: Form the mixture into small cylinders.
- Preheat Air Fryer: Set to 400°F.
- Cook Tots: Place homemade tots in the air fryer basket and cook for 12-15 minutes, shaking halfway through.
Making your own tater tots allows you to control the ingredients and flavor, ensuring a fresh and delicious result.
Reheating Tater Tots
If you have leftovers, reheating tater tots in the air fryer is the best way to maintain their crispiness.
Steps:
- Preheat Air Fryer: Set to 350°F.
- Reheat Tots: Place tater tots in a single layer and cook for 3-5 minutes.
Reheating in the air fryer ensures they stay crunchy and delicious.
Storing Tater Tots
Proper storage keeps your tater tots fresh and ready for the next meal.
- Chill: Toss leftovers in the refrigerator for up to three days, storing them in an airtight container.
- Freezing: If you made homemade tater tots, freeze them before air frying. Place them on a baking sheet in the freezer for an hour, then transfer to a freezer bag.
Avoid refreezing cooked tater tots as it can affect their texture and flavor.
Creative Ways to Use Tater Tots

Loaded Tater Tots
Loaded tater tots are a fun and delicious way to enjoy this snack. They can be customized with a variety of toppings, similar to nachos.
Ingredients:
- Cooked tater tots
- Shredded cheese
- Cooked bacon bits
- Sour cream
- Chopped green onions
- Jalapeño slices
Instructions:
- Prepare Tots: Follow the basic method for how to cook tater tots in air fryer.
- Add Toppings: Once the tots are cooked and crispy, place them on a serving plate. Sprinkle shredded cheese on top and add bacon bits.
- Melt Cheese: Put the loaded tots back in the air fryer for 1-2 minutes to melt the cheese.
- Finish Toppings: Remove from the air fryer and add sour cream, chopped green onions, and jalapeño slices.
This variation is perfect for parties, game days, or as a hearty snack.
Tater Tot Casserole
A tater tot casserole is a comforting dish that combines the crispiness of tater tots with the heartiness of a casserole. It’s an excellent choice for a family dinner.
Ingredients:
- 1 lb ground beef
- 1 can cream of mushroom soup
- 1 cup shredded cheese
- Frozen tater tots
- Salt and pepper to taste
- Chopped onions (optional)
Instructions:
- Cook Beef: In a skillet, brown the ground beef and onions. Season with salt and pepper.
- Combine Ingredients: Mix the cooked beef with the cream of mushroom soup.
- Assemble Casserole: Spread the beef mixture in a baking dish. Top with shredded cheese and then arrange the tater tots on top in a single layer.
- Cook Tots: Refer to the basic method for how to cook tater tots in air fryer to get them crispy.
- Bake Casserole: Place the baking dish in a preheated oven at 350°F for 25-30 minutes until the tater tots are golden brown and the cheese is bubbly.
This dish is sure to be a hit at the dinner table, offering a delightful mix of flavors and textures.
Breakfast Tater Tot Skillet
Start your day right with a breakfast tater tot skillet. This dish combines breakfast favorites into one satisfying meal.
Ingredients:
- Frozen tater tots
- Eggs
- Shredded cheese
- Cooked sausage or bacon
- Chopped bell peppers
- Salt and pepper to taste
Instructions:
- Cook Tots: Follow the basic method for how to cook tater tots in air fryer.
- Prepare Skillet: In a large skillet, cook the sausage or bacon. Remove and set aside.
- Cook Vegetables: In the same skillet, sauté the chopped bell peppers until tender.
- Add Tots and Meat: Add the cooked tater tots and sausage or bacon back to the skillet. Mix well.
- Add Eggs: Make small wells in the mixture and crack an egg into each well. Sprinkle shredded cheese on top.
- Cook Eggs: Cover the skillet and cook until the eggs are done to your liking and the cheese is melted.
This hearty breakfast is perfect for weekend mornings or when you have guests over.
-

How Long to Cook Frozen Tater Tots in Air Fryer: Easy Guide
Air fryers have become a kitchen staple, offering a healthier alternative to deep frying while maintaining that crispy texture we all love. One popular dish you can make in an air fryer is tater tots. But how long do you need to cook frozen tater tots in an air fryer to achieve the perfect crunch? This guide will walk you through everything you need to know, from preparation to cooking times, serving suggestions, and even some handy tips and tricks.
Introduction To How Long To Cook Frozen Tater Tots In Air Fryer
Frozen tater tots are a beloved snack and side dish. When cooked in an air fryer, they become extra crispy without the need for excessive oil. This guide provides detailed instructions on how to cook frozen tater tots in an air fryer, ensuring they turn out perfectly every time.
Preparing Frozen Tater Tots for Air Frying
Choosing the Right Brand
When it comes to frozen tater tots, not all brands are created equal. Popular brands like Ore-Ida, Alexia, and Trader Joe’s offer various options that can affect cooking time and crispiness. Ore-Ida is a go-to for many because it delivers consistently great results. But don’t shy away from experimenting with different brands to find your favorite.
Preheating the Air Fryer
It’s essential to warm your air fryer before cooking. This step ensures your tater tots cook evenly and become perfectly crispy. Set your air fryer to 400°F and let it preheat for about 5 minutes. Preheating not only saves cooking time but also helps achieve that golden brown exterior.
Arranging Tater Tots in the Basket
Proper arrangement of tater tots in the air fryer basket is key to even cooking. Place the tots in a single layer, ensuring they don’t overlap. This allows hot air to circulate around each tot, crisping them up uniformly. If you have a smaller air fryer, you might need to cook in batches to avoid overcrowding.
-

How Long to Cook Tater Tots in Air Fryer? Easy Guide & Tips
Cooking tater tots in an air fryer is a quick and simple way to achieve crispy perfection. Whether you’re a seasoned air fryer user or a newbie, knowing how long to cook tater tots in an air fryer is crucial for the best results. The use of air fryers has completely changed the way we cook since they provide a tasty yet healthy substitute for deep frying. These bite-sized potato delights come out perfectly crispy on the outside and tender on the inside when cooked correctly.
In this comprehensive guide, we’ll cover the optimal cooking time and temperature for air frying tater tots, along with tips and tricks to make them even better. We’ll also explore different seasoning options and serving ideas to take your tater tots to the next level. Whether you’re making a quick snack or a side dish for a meal, you’ll find everything you need to know right here about how long to cook tater tots in an air fryer.
Introduction to How Long To Cook Tater Tots In Air Fryer
Introduction to Air Frying Tater Tots
The way we cook has been completely transformed by air fryers, which provide a tasty but healthy substitute for deep frying. When it comes to tater tots, air frying is a game-changer. These bite-sized potato delights come out perfectly crispy on the outside and tender on the inside. But how long should you cook tater tots in an air fryer to achieve this? The answer depends on a few factors, including the type of tater tots you use and your desired level of crispiness.
In this comprehensive guide, we’ll cover the optimal cooking time and temperature for air frying tater tots, along with tips and tricks to make them even better. We’ll also explore different seasoning options and serving ideas to take your tater tots to the next level. Whether you’re making a quick snack or a side dish for a meal, you’ll find everything you need to know right here.
Preparation
Selecting the Right Tater Tots
Choosing the right tater tots is the first step to crispy perfection. Opt for high-quality brands like Ore-Ida or Alexia, which are known for their consistent texture and flavor. While you can use homemade tater tots, frozen ones are more convenient and yield great results in an air fryer. Ensure that the tater tots are evenly sized to promote even cooking.
Preheating the Air Fryer
Preheating your air fryer is crucial for even cooking. Set your air fryer to 400°F and let it preheat for about 5 minutes. This step helps the tater tots start cooking immediately, ensuring a crispy exterior. Skipping this step can result in unevenly cooked tots.
Cooking Tater Tots

Cooking Time and Temperature
The optimal temperature for cooking tater tots in an air fryer is 400°F. At this temperature, the tater tots will cook evenly and achieve the perfect balance of a crispy outside and a fluffy inside. Here’s a general guideline:
- Standard Tater Tots: Cook for 12-15 minutes, shaking the basket halfway through to ensure even cooking.
- Mini Tater Tots: These cook faster, usually within 10-12 minutes. Check them at the 5-minute mark.
- Extra Crispy Tater Tots: For those who prefer extra crunch, cook for an additional 2-3 minutes.
Steps to Perfectly Cooked Tater Tots
Here’s a step-by-step guide to cooking the perfect tater tots in your air fryer:
- Preheat the Air Fryer: Preheat your air fryer to 400°F.
- Arrange the Tater Tots: Place the tater tots in a single layer in the air fryer basket. Overcrowding can lead to uneven cooking.
- Cook and Shake: Cook for 12-15 minutes, shaking the basket halfway through. This ensures all sides get crispy.
- Check for Doneness: After the initial cooking time, check the tater tots. If you prefer them crispier, add an additional 1-2 minutes.
- Serve Immediately: For the best texture, serve the tater tots right away. As they cool, they usually lose their crunch.
Enhancements and Variations
Seasoning Options
Seasoning your tater tots can take them from ordinary to extraordinary. Here are some popular options:
- Salt and Pepper: Classic and simple.
- Garlic Powder: Adds a savory depth.
- Cajun Seasoning: For a spicy kick.
- Parmesan Cheese: Sprinkle with grated Parmesan for a rich, savory flavor.
- Ranch Seasoning: A blend of herbs and spices for a tangy twist.
Dipping Sauces
No tater tot experience is complete without delicious dipping sauces. Here are some favorites:
- Ketchup: The classic choice.
- Ranch Dressing: Creamy and tangy.
- Barbecue Sauce: Sweet and smoky.
- Cheese Sauce: Rich and gooey.
- Sriracha Mayo: Spicy and creamy.
Serving Suggestions
Serving Ideas
Tater tots make a fantastic side dish or snack. Here are some serving suggestions:
- With Burgers: A great alternative to fries.
- With Hot Dogs: Perfect for a cookout.
- Tater Tot Nachos: Load with cheese, jalapeños, and sour cream.
- Breakfast Casserole: Add tater tots for a hearty breakfast.
- Loaded Tater Tots: Top with chili, cheese, and green onions.
Tater tots are versatile and can be paired with almost any meal. Get creative and enjoy!
Storing and Reheating Leftovers
Got leftovers? No problem! For up to three days, keep tater tots refrigerated in an airtight container. To reheat, preheat your air fryer to 350°F and cook the tater tots for 3-5 minutes until warm and crispy. They maintain their flavor and texture thanks to this technique.
Pro Tips for Perfect Tater Tots

Essential Tips and Tricks
To make the best tater tots in an air fryer, follow these essential tips:
- Use a Single Layer: Arrange the tater tots in a single layer in the air fryer basket. Overcrowding can lead to uneven cooking.
- Midway during: the cooking process, give the basket a shake. This ensures all sides of the tater tots get crispy.
- Preheat the Air Fryer: Always preheat your air fryer to the recommended temperature. This helps achieve even cooking from the start.
- Season After Cooking: For the best flavor, season your tater tots immediately after cooking while they are still hot.
- Use Non-Aerosol Spray: If you use cooking spray, opt for a non-aerosol spray to avoid damaging the air fryer’s non-stick coating.
Adjusting Cooking Times Based on Quantity
Cooking Different Quantities of Tater Tots
The amount of tater tots you cook can affect the cooking time. If you’re wondering how long to cook tater tots in air fryer for different quantities, here are some guidelines:
- Small Batch (1-2 cups): Cook for 10-12 minutes at 400°F, shaking halfway through.
- Medium Batch (3-4 cups): Cook for 12-15 minutes at 400°F, shaking halfway through.
- Large Batch (5-6 cups): Cook for 15-18 minutes at 400°F. Shake the basket every five minutes to guarantee even frying.
Always keep an eye on the tater tots and adjust the cooking time as needed to achieve your desired level of crispiness. Remember, air fryers can vary, so it might take a bit of experimentation to get it just right.
Common Mistakes and How to Avoid Them
Avoiding Common Air Fryer Mistakes
When using an air fryer, understanding how long to cook tater tots in an air fryer is crucial, but avoiding common mistakes is equally important. Here are some frequent errors and tips to prevent them:
- Overcrowding the Basket: Placing too many tater tots in the basket at once can lead to uneven cooking. Always cook in a single layer to ensure each tot gets crispy.
- Skipping the Shake: Not shaking the basket halfway through cooking can result in some tater tots being undercooked. Make it a habit to shake the basket at least once during cooking.
- Ignoring Preheating: Just like with a traditional oven, preheating your air fryer is essential for achieving a consistent temperature. This step helps in cooking the tater tots evenly.
- Using Too Much Oil: While a small amount of oil can enhance crispiness, using too much can lead to greasy tater tots. A light spray is all you need.
- Not Adjusting Cooking Time: Different air fryers may require slight adjustments in cooking time. Always keep an eye on your tater tots and adjust the time as needed for your specific model.
Exploring the Benefits of Air Frying
Health Benefits of Using an Air Fryer
Understanding how long to cook tater tots in an air fryer is just one part of the equation. It’s also important to recognize the health benefits of using an air fryer. Here are some key advantages:
- Reduced Oil Consumption: Air fryers use hot air to cook food, which significantly reduces the need for oil. This can lead to lower calorie intake and a reduction in unhealthy fats. Traditional frying methods often require cups of oil, while air frying might need only a tablespoon or less.
- Lower Acrylamide Levels: Air frying produces lower levels of acrylamide, a potentially harmful chemical formed when starchy foods are cooked at high temperatures. This makes air-fried foods a healthier alternative to deep-fried options.
- Fewer Calories: Because air-fried foods use less oil, they generally contain fewer calories than their deep-fried counterparts. Both managing weight and general health can benefit from this.
- Crispy Texture Without the Guilt: One of the biggest draws of air frying is achieving a crispy texture without the extra fat and calories of traditional frying. Foods like tater tots come out crunchy and delicious, satisfying your craving for fried foods in a healthier way.
- Versatility: Air fryers are incredibly versatile and can be used for a wide range of cooking methods, including baking, roasting, and grilling. This versatility makes it easier to prepare a variety of healthy meals with one appliance.
For more detailed information on the health benefits of air frying, check out this Mayo Clinic article and this The Healthy article.
By understanding these benefits, you can make more informed decisions about incorporating air-fried foods into your diet. Knowing how long to cook tater tots in an air fryer ensures that you can enjoy this tasty snack in a healthier way.
Air Fryer Maintenance and Safety Tips
Maintaining and Safely Using Your Air Fryer
Knowing how long to cook tater tots in an air fryer is crucial, but maintaining and using your air fryer safely ensures it lasts longer and performs optimally. Here are some essential maintenance and safety tips:
-
Regular Cleaning:
- After each use, clean the air fryer basket, tray, and pan with warm soapy water. This prevents the buildup of grease and food particles, which can affect the taste of your food and the performance of the appliance. Avoid using abrasive sponges that could damage the non-stick coating.
-
Avoid Overfilling:
- Overcrowding the air fryer basket can lead to uneven cooking and potential safety hazards. Always ensure there’s enough space for air to circulate around the food. Cooking in smaller batches might take a bit longer but ensures better results.
-
Check the Power Cord:
- Check the power cord for wear and damage on a regular basis. A damaged cord can be a fire hazard. If you notice any issues, replace the cord or consult with the manufacturer for repairs.
- Preheat Safely
- : When preheating your air fryer, ensure it’s placed on a heat-resistant surface and away from walls or other appliances. This prevents overheating and potential fire risks. Always follow the manufacturer’s instructions for preheating.
-
Use Appropriate Cooking Spray:
- Avoid using aerosol cooking sprays, as they can contain propellants that damage the air fryer’s non-stick coating. Opt for a non-aerosol spray or lightly brush oil onto the basket.
-
Monitor Cooking Times:
- Keep an eye on cooking times to prevent burning or overcooking your food. If you’re ever unsure about how long to cook tater tots in an air fryer, start with the recommended time and adjust based on your specific air fryer model and personal preference.
-
Store Properly:
- Keep your air fryer in a dry, cold place when not in use. Ensure it’s unplugged and clean before storing it away.
By following these maintenance and safety tips, you can ensure your air fryer remains in good condition and continues to produce delicious meals safely.
Frequently Asked Questions About How Long To Cook Tater Tots In Air Fryer
FAQ Section
- Do you need to spray tater tots with oil? While not necessary, spraying with oil helps achieve a crispier texture. Use a non-aerosol spray like avocado or vegetable oil for best results.
- Can you cook tater tots from frozen? Yes, it’s best to cook tater tots directly from frozen. This ensures a crispy exterior and fluffy interior.
- How to make extra crispy tater tots? For extra crispiness, cook the tater tots for an additional 2-3 minutes at 400°F. Halfway through, give the basket a shake to guarantee even cooking.
- Can you reheat tater tots in the air fryer? Yes, preheat the air fryer to 350°F and cook the tater tots for 3-5 minutes until warm and crispy.
- How to prevent tater tots from sticking to the air fryer basket? Lightly spray the basket with oil before adding the tater tots. This helps prevent sticking and promotes even cooking.
Conclusion of How Long To Cook Tater Tots In Air Fryer
Cooking tater tots in an air fryer is a simple yet delicious way to enjoy this popular snack. By following the recommended cooking times and temperatures, and incorporating various seasonings and sauces, you can elevate your tater tots to a whole new level. Whether you’re making a quick snack or a side dish, these tips and tricks will ensure perfect tater tots every time. Experiment with different flavors, get creative with serving ideas, and enjoy the crispy goodness of air-fried tater tots!
-

Tater Tots in Air Fryer: Easy Recipe for Perfectly Crispy Tots
Tater tots are a beloved snack, and cooking them in an air fryer can elevate their crispiness to a new level. This article will guide you through every step of making tater tots in an air fryer, ensuring you get perfectly crispy results every time. From preparation to cooking tips and serving suggestions, we’ve got you covered. Let’s dive into the world of air-fried tater tots and discover how to make this delightful treat at home.
Introduction to Tater Tots in Air Fryer
Air fryer tater tots are a game-changer. These crispy, golden nuggets are quick and easy to make, delivering a satisfying crunch with every bite. If you’re a fan of tater tots, you’ll love how the air fryer enhances their texture and flavor.
Why Use an Air Fryer?
Air fryers are revolutionizing how we cook, offering a healthier alternative to deep frying. They use hot air to cook food, resulting in a crispy exterior without the need for excessive oil. For tater tots, this means you can enjoy all the crunch without the guilt. Air fryers also cook food faster than traditional ovens, making them perfect for quick snacks or side dishes. Plus, they’re incredibly user-friendly, making them ideal for anyone, whether you’re a kitchen novice or a seasoned chef.
Using an air fryer for tater tots not only saves time but also ensures even cooking. The circulating hot air reaches all sides of the tots, giving them a uniform golden-brown finish. This method also locks in flavor and moisture, ensuring your tater tots are crunchy on the outside and soft on the inside. If you haven’t tried cooking tater tots in an air fryer yet, you’re in for a treat.
The Magic of Air-Fried Tater Tots
The magic of air-fried tater tots lies in their simplicity and efficiency. Just a few minutes in the air fryer transforms frozen tater tots into crispy, mouth-watering bites. Unlike traditional frying, there’s no messy oil to deal with, and the results are just as satisfying, if not more so.
One of the key benefits of using an air fryer is the ability to cook with less oil. This not only makes the tater tots healthier but also reduces the calories and fat content. Moreover, air fryers are incredibly versatile. You can experiment with different seasonings and flavors to create your perfect batch of tater tots. From classic salt and pepper to more adventurous blends like garlic powder or Cajun spice, the possibilities are endless.
In addition, air fryers are perfect for those who are short on time. A typical batch of tater tots cooks in about 15 minutes, making them an ideal option for busy weeknights or impromptu gatherings. Plus, they retain their crunch and flavor even when reheated, making them a great option for leftovers. So, whether you’re looking for a quick snack or a tasty side dish, air fryer tater tots are the way to go.
Preparation and Cooking Instructions

How to Cook Tater Tots in an Air Fryer
Step-by-Step Instructions
Cooking tater tots in an air fryer is straightforward. Here’s how to do it:
- Preheat the Air Fryer: Set your air fryer to 400°F and let it preheat for about 3-5 minutes. Preheating ensures that the tater tots start cooking immediately and become crispy.
- Prepare the Tater Tots: Place frozen tater tots in a single layer in the air fryer basket. This helps them cook evenly. You may have to cook in batches if your air fryer is smaller.
- Cook the Tater Tots: Air fry the tater tots for 12-15 minutes, shaking the basket halfway through cooking to ensure even crisping. Depending on your air fryer model, you might need to adjust the time slightly. For extra crispiness, cook for an additional 1-2 minutes.
- Season the Tater Tots: Once cooked, immediately sprinkle the tater tots with your favorite seasoning, such as salt, garlic powder, or paprika. The heat will help the seasoning stick better.
Tips for Achieving Maximum Crispiness
Achieving maximum crispiness with air fryer tater tots involves a few key tips:
- Use a Light Oil Spray: Lightly spray the tater tots with a non-aerosolized cooking spray before cooking. This not only helps them achieve a golden-brown color but also prevents sticking. Avocado oil or vegetable oil are great choices due to their high smoke points (Source: The Kitchn).
- Shake the Basket: Shaking the basket halfway through cooking ensures that all sides of the tater tots get equal exposure to the hot air. This is crucial for even browning and crispiness.
- Avoid Overcrowding: For the crispiest results, arrange the tater tots in a single layer. Overcrowding the basket can lead to uneven cooking. If necessary, cook in batches to ensure each tot gets crispy.
- Adjust Cooking Time as Needed: Different air fryer models may cook at different rates. Start checking for doneness at the 12-minute mark. If they need more time, continue cooking in 2-minute increments until they reach your desired crispiness.
- Season Immediately: Seasoning the tater tots right after cooking ensures that the spices stick better, enhancing flavor and texture.
Tips for Perfect Tater Tots

Pro Tips for Perfect Air Fryer Tater Tots
Using Oil Spray and Seasoning
To achieve that ideal golden crisp, a light spray of oil can make all the difference. Non-aerosol cooking sprays, such as avocado or vegetable oil, are perfect. These oils help the tater tots brown evenly and prevent sticking to the basket. Avoid extra virgin olive oil, as its low smoke point might impart a bitter taste.
Seasoning is another essential element. While classic salt and pepper work wonders, don’t hesitate to get creative. Garlic powder, paprika, or a dash of Cajun spice can elevate your tater tots to a new level. Season immediately after cooking to ensure the spices adhere well.
Shaking the Basket and Avoiding Overcrowding
Shaking the basket halfway through cooking is crucial. This ensures all sides of the tater tots are exposed to the hot air, promoting even crisping. Aim to shake the basket at least once during the cooking process.
Avoid overcrowding the basket. When tater tots are too close together, the hot air can’t circulate properly, leading to uneven cooking. Arrange them in a single layer for optimal effects. If you have a small air fryer, consider cooking in batches to achieve the best texture.
Adjusting Cooking Time and Seasoning Immediately
Different air fryers may cook at varying speeds. Begin checking your tater tots for doneness around the 12-minute mark. If they’re not crispy enough, continue cooking in 2-minute increments until they reach the desired texture.
Season the tater tots as soon as they come out of the air fryer. The residual heat helps the seasoning adhere better, enhancing both flavor and texture. This small step makes a big difference in the overall taste experience.
Serving Suggestions
Best Dipping Sauces for Tater Tots
Popular Dipping Sauces
Tater tots are fantastic on their own, but pairing them with a delicious dipping sauce can take them to the next level. Classic options like ketchup, mustard, and ranch dressing are always popular. For a tangy twist, try barbecue sauce or honey mustard.
If you’re feeling adventurous, homemade sauces are a great way to experiment with flavors. Consider making a garlic aioli, spicy sriracha mayo, or a zesty cheese dip. These sauces add an extra layer of flavor that complements the crispiness of the tater tots perfectly.
Homemade Dipping Sauce Recipes
For those who love to experiment in the kitchen, homemade dipping sauces are a must. A simple garlic aioli can be made by mixing mayonnaise with minced garlic, lemon juice, and a pinch of salt. Spicy sriracha mayo is another favorite, combining mayonnaise with sriracha sauce and a touch of lime juice.
If you’re a cheese lover, try making a quick cheese dip. Melt some cheddar cheese with a splash of milk and a teaspoon of butter. Add a pinch of garlic powder and paprika for extra flavor. These homemade sauces are not only delicious but also allow you to control the ingredients and flavors to your liking.
Storage and Reheating
How to Store and Reheat Tater Tots
Best Practices for Storing Leftover Tater Tots
Storing leftover tater tots properly ensures they stay crispy and delicious for your next snack. Place any leftovers in an airtight container to maintain their texture. For up to three days, keep them refrigerated. This method keeps the tater tots from becoming soggy and preserves their flavor.
When storing, avoid stacking them too much, as this can cause them to lose their crispiness. If you have a large batch, consider placing parchment paper between layers to maintain their texture. Freezing already cooked tater tots is not recommended, as they can become mushy when reheated.
Reheating Methods for Maintaining Crispiness
Reheating tater tots in an air fryer is the best way to restore their original crispiness. Preheat your air fryer to 375°F, then place the tater tots in a single layer in the basket. Heat them for about 5 minutes, shaking the basket halfway through to ensure even heating. This method quickly revives their crunchy exterior and warm interior.
Alternatively, you can reheat tater tots in the oven. Preheat your oven to 350°F and spread the tater tots on a baking sheet in a single layer. Bake them for 10 minutes or until they’re heated through and crispy. While the microwave is an option, it tends to make tater tots soggy and is not recommended for the best texture.
Creative Tater Tot Recipes

Unique Ways to Use Tater Tots
Tater Tot Breakfast Casserole
Transform your mornings with a tater tot breakfast casserole. This dish combines the crispy goodness of tater tots with savory breakfast ingredients. Start by layering cooked tater tots at the bottom of a baking dish. Beat the eggs, milk, pepper, and salt in a another bowl. Pour this mixture over the tater tots. Add cooked bacon, sausage, or ham, along with shredded cheese. Bake at 350°F for 30-35 minutes until the eggs are set and the top is golden brown. This hearty casserole is perfect for feeding a crowd and can be customized with your favorite breakfast ingredients.
Loaded Tater Tot Nachos
Elevate your snack game with loaded tater tot nachos. Begin by air frying a batch of tater tots until crispy. Arrange the tots on a baking sheet and top with shredded cheese, cooked ground beef or chicken, black beans, and jalapeños. Bake in the oven at 375°F until the cheese melts and everything is heated through, about 5-7 minutes. Finish with fresh toppings like diced tomatoes, green onions, sour cream, and guacamole. These loaded tater tot nachos are a fun and tasty twist on traditional nachos, perfect for game day or casual gatherings.
Tater Tot Shepherd’s Pie
Give the classic shepherd’s pie a modern twist by using tater tots. Start by cooking ground beef or lamb with onions, garlic, and mixed vegetables. Add beef broth and a bit of flour to create a savory gravy. Pour this mixture into a baking dish and top with a generous layer of tater tots. Bake at 375°F for 25-30 minutes until the tater tots are golden and crispy. This tater tot shepherd’s pie combines the comforting flavors of a traditional dish with the crunchy texture of tater tots, making it a family-friendly meal that’s sure to please.
Buffalo Chicken Tater Tot Casserole
Spice up your dinner with a buffalo chicken tater tot casserole. Mix shredded cooked chicken with buffalo sauce and spread it in a baking dish. Top with a layer of tater tots and sprinkle with blue cheese crumbles or shredded mozzarella. Bake at 375°F for 25-30 minutes until the tater tots are crispy and the cheese is melted. Garnish with chopped celery and a drizzle of ranch or blue cheese dressing before serving. This casserole is a great way to enjoy the flavors of buffalo chicken wings in a fun and satisfying dish.
Tater Tot Pizza
Combine two favorite foods with a tater tot pizza. Arrange air-fried tater tots in a circular pattern on a baking sheet to form the “crust.” Spread marinara sauce over the tots and top with shredded mozzarella cheese and your preferred pizza toppings, such as bell peppers, mushrooms, and pepperoni. Bake at 400°F for 10-15 minutes until the cheese is melted and bubbly. This tater tot pizza is a playful and delicious way to enjoy pizza night with a crispy twist.
FAQs
Frequently Asked Questions
Do You Need to Defrost Tater Tots Before Air Frying?
No, you don’t need to defrost tater tots before air frying. Cooking them directly from frozen helps achieve a crispy exterior while keeping the inside fluffy. The hot air circulation in the air fryer cooks them evenly, making defrosting unnecessary.
How Long Should You Cook Tater Tots in an Air Fryer?
Typically, tater tots should be cooked at 400°F for 12-15 minutes. However, cooking times can vary based on the air fryer model and the quantity of tater tots. Check them at the 12-minute mark and add extra time in 2-minute increments if needed. Shaking the basket halfway through ensures even cooking.
What Temperature Should You Use for Cooking Tater Tots?
400°F is the perfect temperature to cook tater tots in an air fryer. This high temperature ensures a crispy exterior and a fluffy interior. Always preheat the air fryer before adding the tater tots for the best results.
Can You Stack Tater Tots in an Air Fryer?
While it’s possible to stack tater tots in an air fryer, it’s not recommended for the crispiest results. Stacking can prevent hot air from circulating evenly, leading to uneven cooking. For the best texture, cook tater tots in a single layer. If you need to cook a larger quantity, work in batches to ensure each tot is perfectly crispy.
Conclusion of Tater Tots in Air Fryer
Air fryer tater tots are a quick, easy, and delicious snack that everyone loves. By following these tips and tricks, you can achieve perfectly crispy tater tots every time. From cooking techniques to storage solutions, this guide has covered everything you need to know. Enjoy experimenting with different seasonings and serving ideas to make your tater tots even more delightful. So fire up your air fryer and get ready to enjoy the best tater tots ever!